HOW TO DRAW BIDO: THE OFFICIAL FUNNY BIDO GUIDE
There's a real dearth of Bido art in the FMA fandom-- besides mine, that is, since I basically draw him every day of my life. Part of this is likely due to his status as a minor character everyone forgets about, but then there's plenty of art of the rest of the Nest that just doesn't include him. What gives?
I'd hazard a guess that a contributing factor to the Bido deficiency is his design. It's a well-documented fact of life in fandom that people are biased towards Hot Characters, and the characters most people in fandom find hot tend to be thin (or muscular), young, and same-faced. Nobody wants to draw a short, bald, chubby-cheeked, big-nosed middle-aged man, and the fact that art tutorials tend to focus on a particular standard of attractiveness makes it so that when someone actually does, more often than not they don't know how and the Internet doesn't help.
So in an effort to help those few brave souls who want to step up to the plate, here's a guide to drawing Bido by someone who's been doing it for over two years now. He's been a real inspiration for my art, and I've improved drastically in the time since I started drawing him reguarly. I'll try to approach this from a couple different angles. Even if one part doesn't help you, maybe another will!
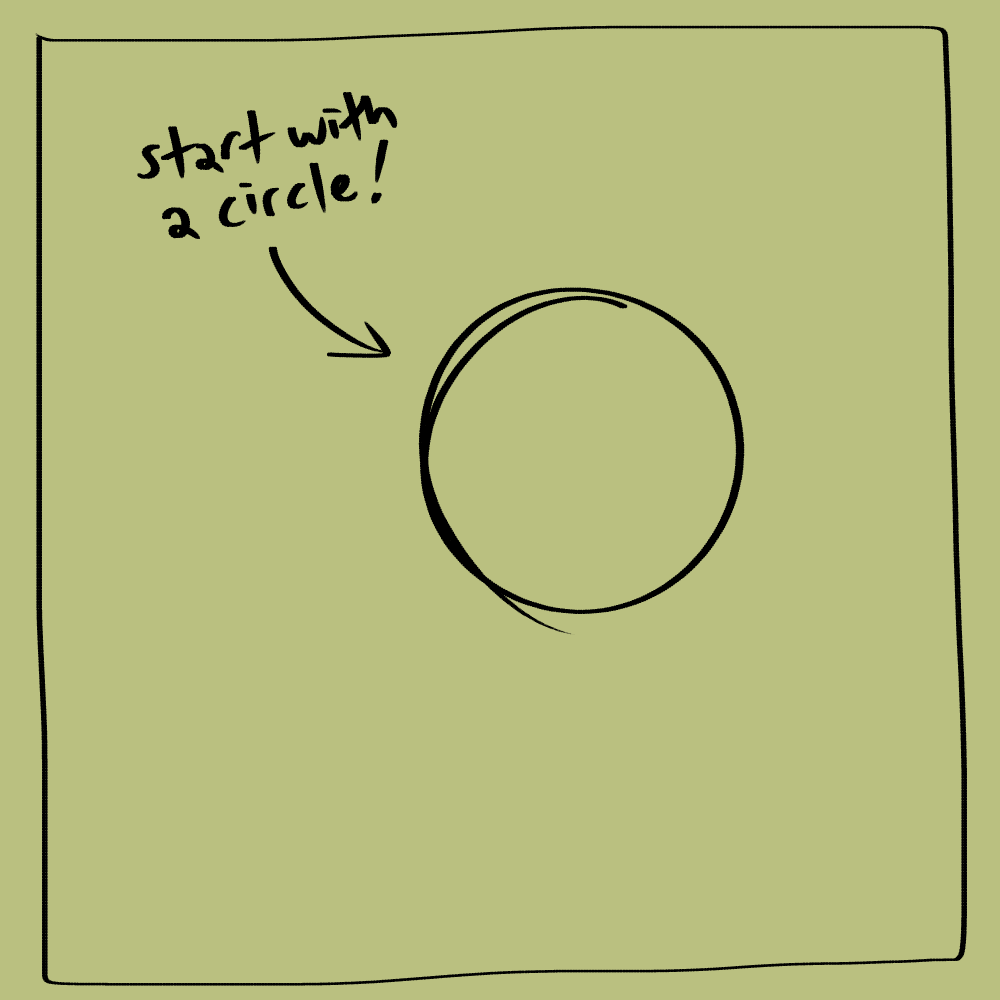
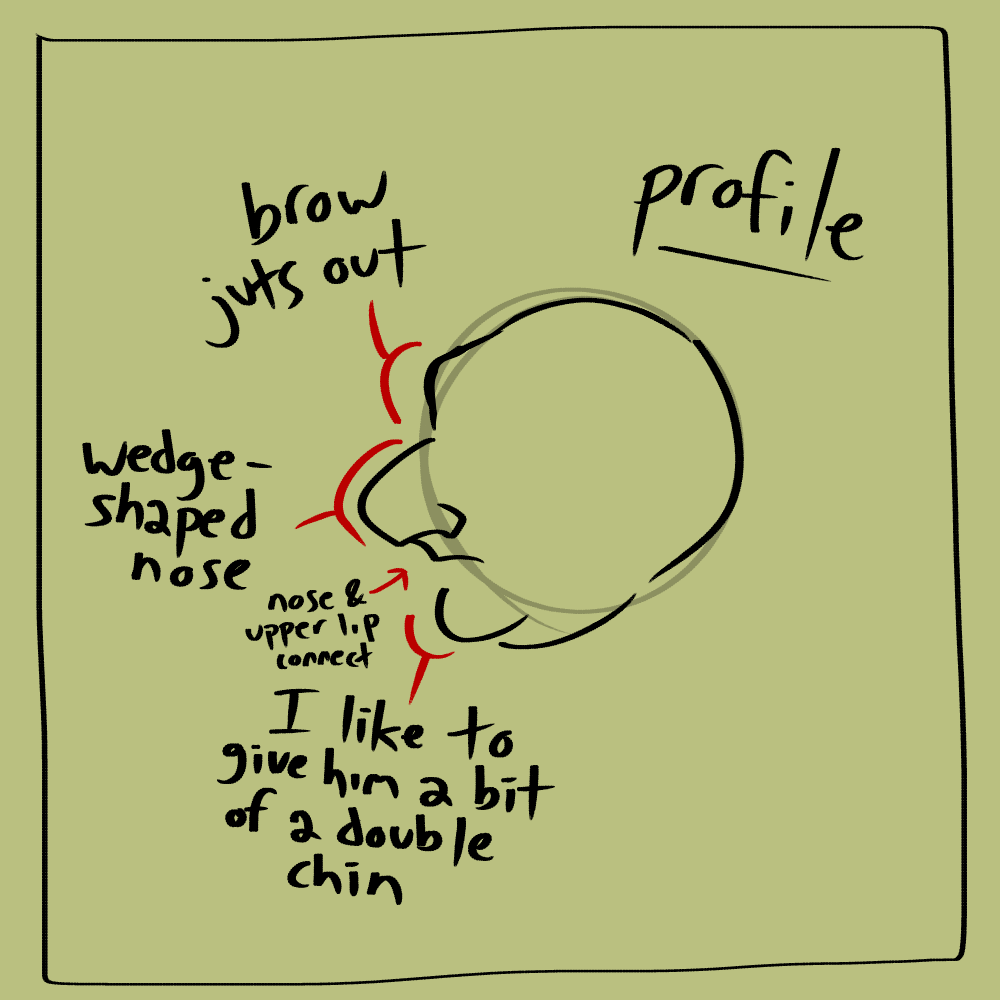
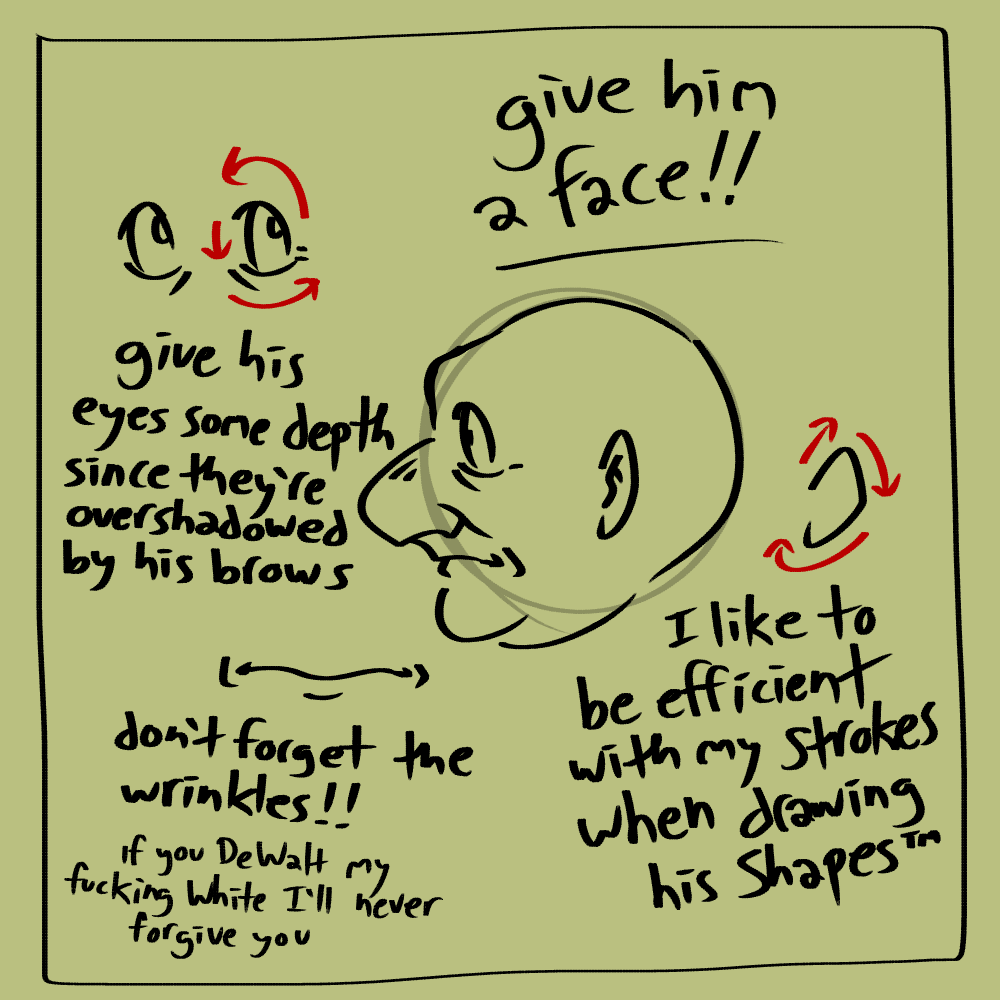
First up, here's a bog-standard step-by-step walkthrough of how I'd go about drawing Bido from the side.

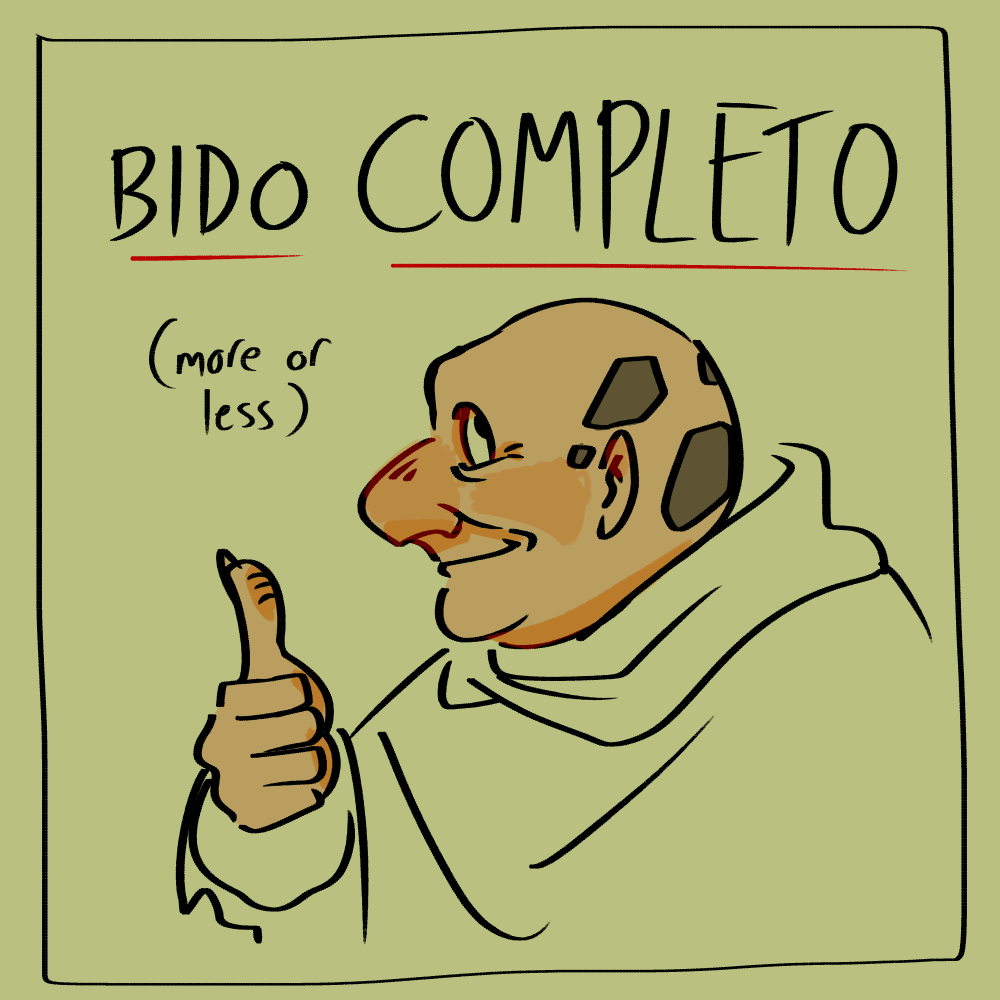
...Which is straightforward enough, I hope. But maybe just copying my steps doesn't help you understand the process any better. In which case, let's take a step back and look at the bigger picture.
As we've discussed, Bido's design combines many features that are uncommon in typical 'anime style', and which people might therefore feel out of their depth drawing. You can tell by how impossible it is to make him in basically any given Picrew. So let's take a look at each of these features and see if we can't make them a little easier to understand.
Drawing Noses
Noses! We (almost) all have them, and they come in all kinds of different shapes and sizes. So it makes me sad that so much stylized art, many anime and manga especially, reduces the nose to a single line or does away with it altogether just because it isn't as "expressive" as the eyes or mouth. Noses are great! They give a face character, and really help to make a design stand out, and when I see people drawing Bido with a tiny little button nose a little piece of my heart dies.
But how to properly capture the beauty of a nose? It helps, in my experience, to think of it in three dimensions. A nose isn't just a decoration, it's a fixture-- a landmark in the topography of the face. Try outlining where the nose should go before you draw it.
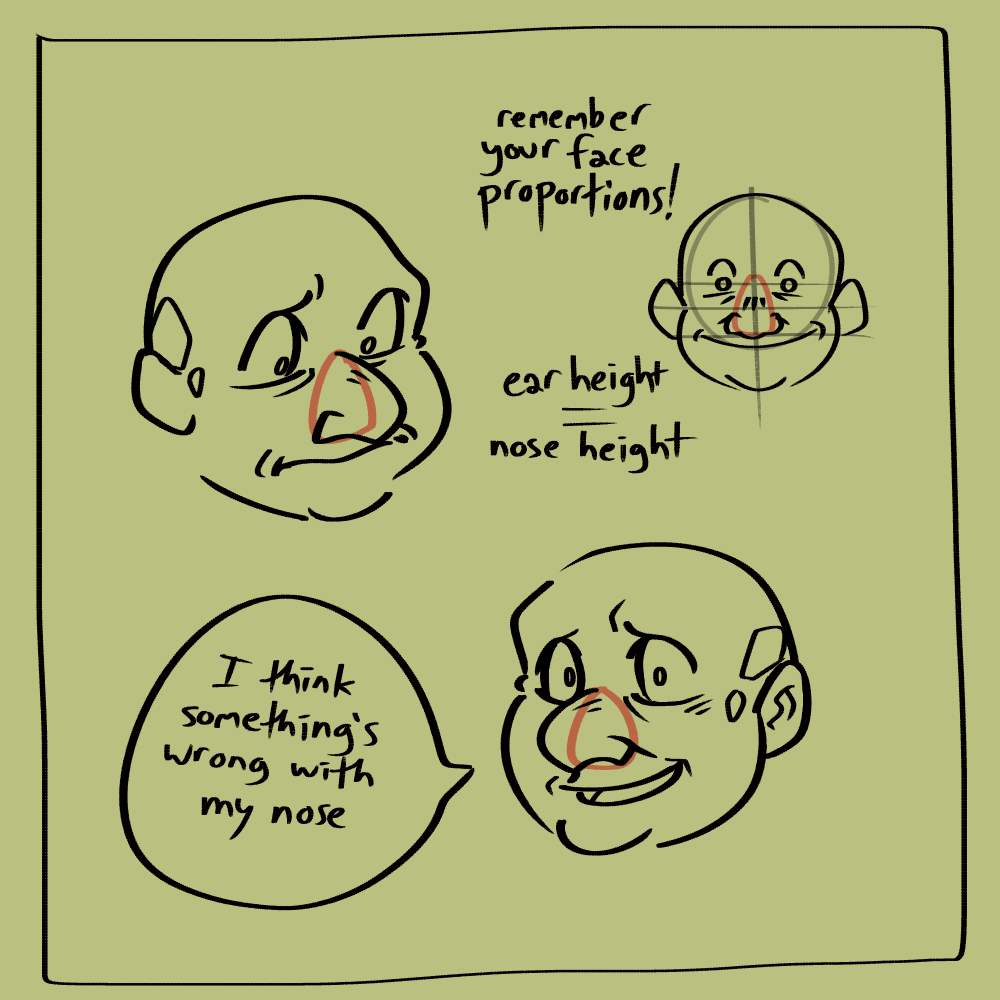
No matter what shape or size a nose is, they all have the same basic parts. There's the bridge (which is where the skull helps give it its structure), the tip, and the nostrils. Try looking at some pictures of real noses and paying attention to how each of these parts are shaped and connect to each other. Then take a look at Bido's nose again!
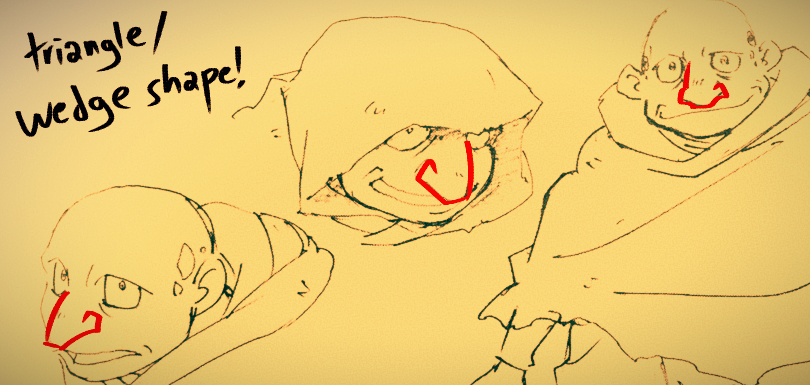
It has a long bridge that slopes gently down and a sort of flat tip. It sticks almost straight out from his face. A good thing to keep in mind is not to draw it too exaggeratedly hooked or downturned in a way that might evoke an antisemitic caricature, especially considering Bido is a literal lizard person and there's long and unfortunate history behind that particular association; he's got kind of exaggerated features as it stands, so being mindful of that territory is important. Stay within the "Japanese caricature of an old white guy" zone instead.
Hopefully with an improved mastery over noses, your Bido art will come out looking more like Bido. Scroll up and click the other tabs for more!
Chubby Cheeks and Double Chins
A quick Google image search for "how to draw faces" will net you countless lovingly contoured cheekbones and chiseled jawlines. Unless you go looking for it, most art tutorials won't teach you about different face shapes than that beyond maybe changing the proportions depending on age, or making men that look like Jorgen von Strangle. But many people and characters don't look anything like that, and as an artist it's important to know how to draw them. For studies of how fat lies in bodies in general I'd recommend the book Morpho: Fat and Skin Folds, the PDF of which you can find floating around online, as well as just plain observation and practice, but while you're here and need tips as they relate to Bido from Fullmetal Alchemist then here are some things I've learned.
Bido's face is wide-set and bottom-heavy. It can take some practice to get the shape down; I recommend marking where the chin is going to be first, and then connecting it with the cheek afterwards, so you know you have the size of the face right. Bido's wide mouth can make things tricky as it kind of displaces where fat might otherwise sit on a face with a smaller mouth, but if you map out the Zones first it's easier to keep in mind where the curves should be.
[img here]
Speaking of zones-- notice the neck? That's one of the top places where fat accumulates, and it's why I don't draw Bido with a skinny neck-- it just looks unrealistic combined with such a round face. Someone with a chubby face likely has a thicker neck too, and definitely some fat under their lower jaw (called the submental area), which is what forms a "double chin". Bido has a decent-sized chin to begin with so it still sticks out past his neck. The line of his cheek should lead into the line of the double chin, not his jawline, like so. Fat sits under the skin and above the bones and muscle; those things shouldn't be defined if they're underneath a layer of fat.
[img here]
But wait! Speaking of skin, no discussion about how fat sits on a face is complete without thinking about WRINKLES. Head on over to the next tab to see more about that.
Drawing Wrinkles
Rubs my hands together. Let me tell YOU. About the importance of drawing wrinkles on your middle-aged men. They're vital to their survival. And also mine. That's right, every smooth, baby-skinned old man drawing I see online takes three months off my life expectancy.
The thing about wrinkles is that they're incredibly fun to draw when you know what you're doing. The other thing about wrinkles is that you can't just slap them on willy-nilly. Like noses, they aren't two-dimensional decorations; they're part of the topography, representing the borders of zones of fat or areas of repeated stretching and squashing. Know where wrinkles form and why, and your faces will be looking more three-dimensional and lifelike in no time-- even if you aren't drawing a 50 year old bald guy. Because we've all* got wrinkles! It's up to you what level of detail to include in your art, of course, but even in very stylized drawings, wrinkles can elevate an expression, be used for comedic or dramatic effect... or just signal a character's age so the fandom stops thinking he's a child for being under 5 feet tall.
Here are some key places to put wrinkles:
- Under and around the eyes!
- The borders of the cheek, coming down from the nostrils and around the mouth!
- Around the chin!
- The very edges of the mouth!
- On the forehead, over the brow ridge!
- Between the brows!
To get a better grasp on where wrinkles form, try studying photos or people around you-- or even better, go find a mirror, make weird faces at yourself, and take note of what places get all scrunched up. Get silly with it; that's the spirit of Funny Bido. Then see if you can translate your new knowledge onto the page!
* excluding souls bonded to suits of armor, dwarfs in flasks, and anyone else going around with no skin. My condolences.
So that's his face-- but what about the rest of him? Here are some tips for drawing his body and clothes.
[INSERT TUTORIAL HERE]
Maybe, though, you're having trouble on a more fundamental level. Maybe you don't need tips about drawing Bido so much as tips on how to draw, period. And that's a little harder, because everyone comes at art differently, but I'll try my best to at least explain how I got into the groove of improving my skills.
As you'll know if you've visited this page, or knew about the blog already, this site is named after a blog I started up on a whim to post my occasional goofy drawings of Bido. At first it was just halfassed joke art I made in MS Paint, but then I started accepting prompts, and soon enough I was hitting a stride of at least one full-fledged comic strip per day. Eventually I burned myself out a little bit and fell off of that schedule, but I still kept drawing Bido whenever I could, because it was fun and nobody else was doing it.
It was kind of incredible how quickly I started seeing improvement. At first I had a little trouble drawing Bido's features consistently, but as I did it more, I internalized shortcuts and was able to visualize what I wanted to draw a lot better. And this translated to drawing other characters as well. Turns out the old saying about practice making perfect is true! But putting it like that can be a little confusing, because it's easy to take 'practice' as meaning drawing the same thing over and over. That's only part of the process. Learning involves observation, too-- being able to look at things with an artist's eye, both in works of art (your own and others') and in real life. Especially real life! If you only teach yourself to draw by observing other drawings, you're removing your own perspective of reality from the equation. Draw the same thing over and over, but add something new every now and then: something you just noticed about the human body (recent personal example: fingernails start just about halfway up the first joint of the finger!), a new method of shading, a different brush or medium. Have your muse, and play with it. Learning how to do art shouldn't be a chore. Give yourself the right amount of enrichment and not only will you learn a lot faster, but the journey will be just as satisfying as the destination.
Of course, if you do start to feel like you're pushing yourself too hard, it's okay to take a break. Creative juices run out sometimes; it happens to everybody, and doesn't mean anything bad about you as an artist. In the meantime, you don't have to stop learning. You can make more observations to incorporate into your art, and when you start up again you'll have that much more expertise under your belt.
I realize this entire tutorial kind of hinges on the aspiring artist having that kind of all-consuming muse they can focus on for ages and never get bored of, and draw for its own sake and very little else. And I don't really have an answer for you if you don't have that kind of thing in your life. Draw different kinds of stuff you like a normal amount, I guess? Sorry I can't transfer you any of my autism. Get well soon.